-
RDS-Setup-Guide-B-Sample-08FEB2023
-
 RDS Setup Guide - B sample - asset editor.pptx
-
README.md
RDS-Setup-Guide--B-Sample--08FEB2023
 by
by 
Unboxing 📦
Unboxing
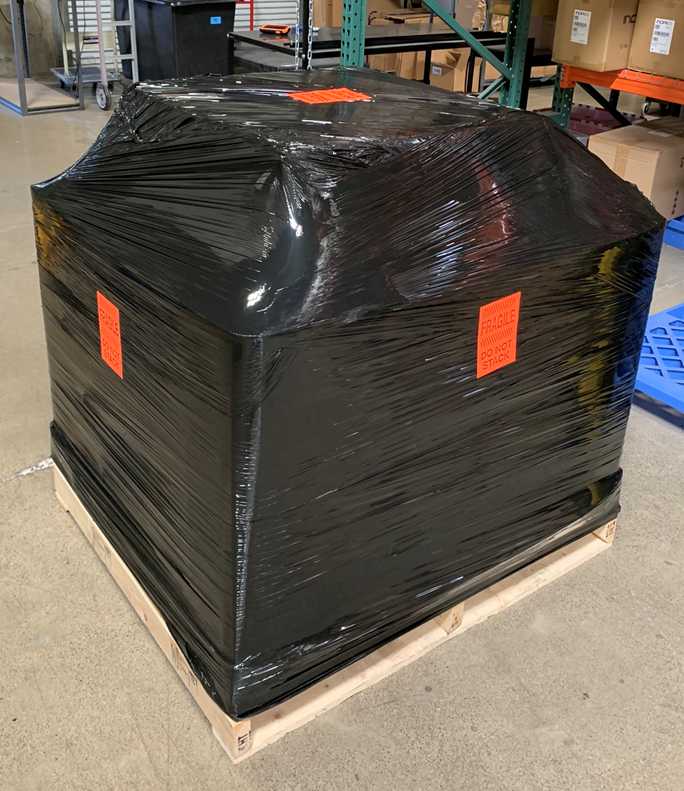
RDS Solution should arrive as shown:
Master Carton
Removing the shrink wrap will reveal the overpack boxes underneath:
Overpack
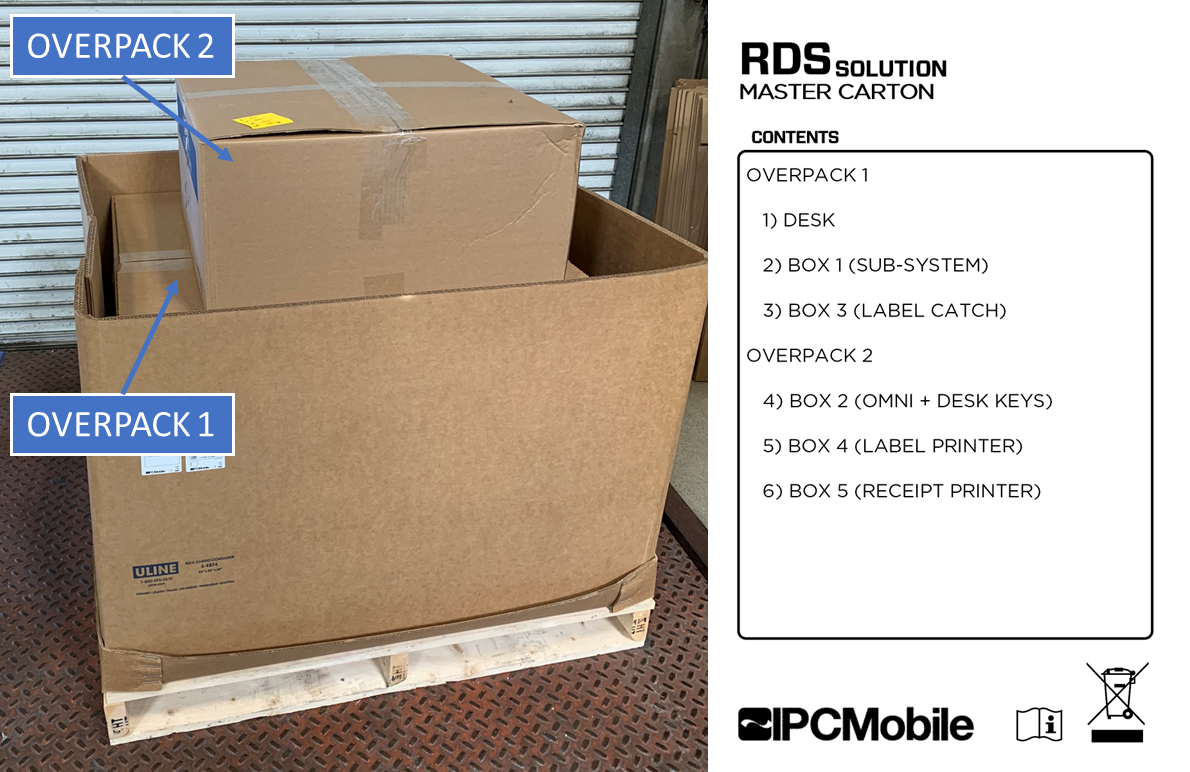
Packaged Contents:
OVERPACK 1
RDS DESKBOX 1 (SUB-SYSTEM)BOX 3 (LABEL CATCH)
OVERPACK 2
BOX 2 (OMNI DEVICE)BOX 4 (LABEL PRINTER)BOX 5 (RECEIPT PRINTER)
Unboxing OVERPACK 1
- Keep box orientated as packaged on pallete skid. Opening up the top will reveal contents within:
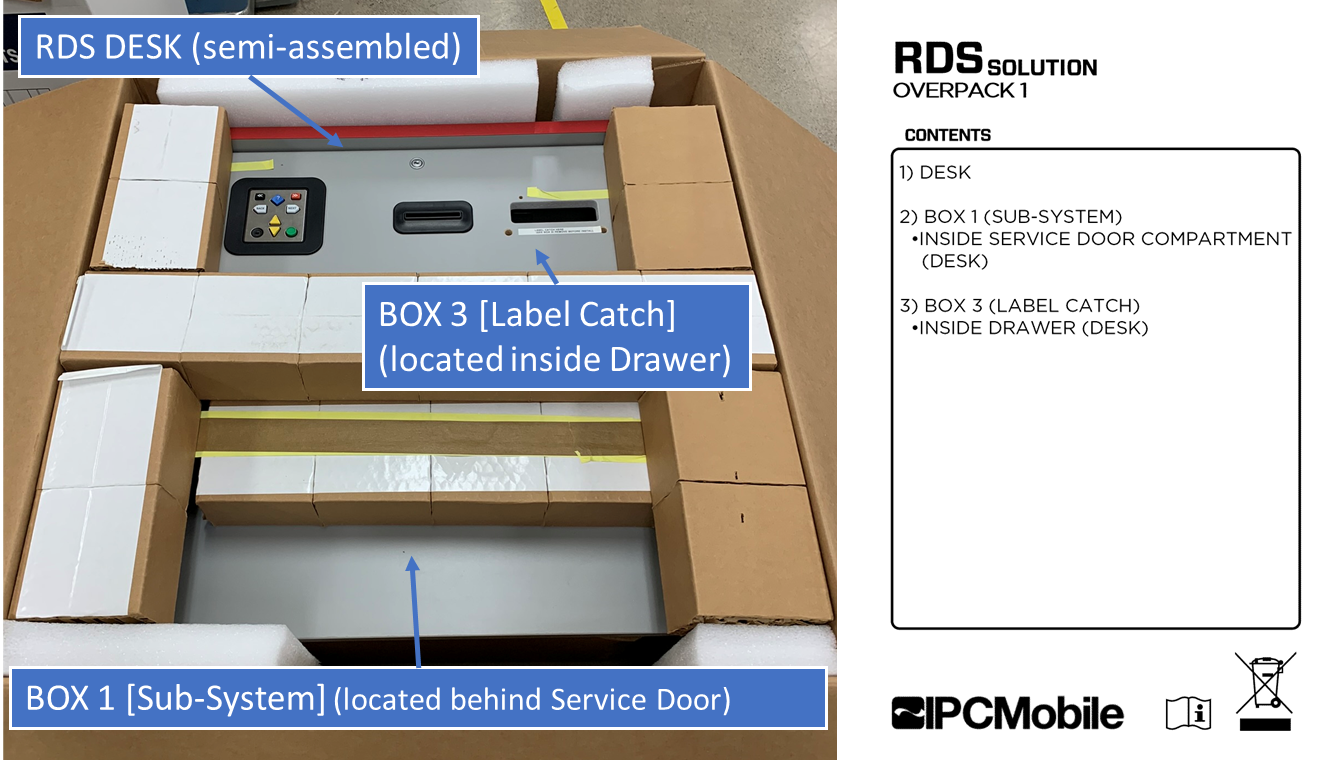
Note
BOX 1is located in the area behind the Service Door andBOX 3is located within the Drawer ofRDS DESK.
- Remove upper packaging contents to gain access to
RDS DESK. - Remove
BOX 1andBOX 3from their respective areas nested withinRDS DESK. [^1] - Remove
RDS DESKand place upright onto its feet.
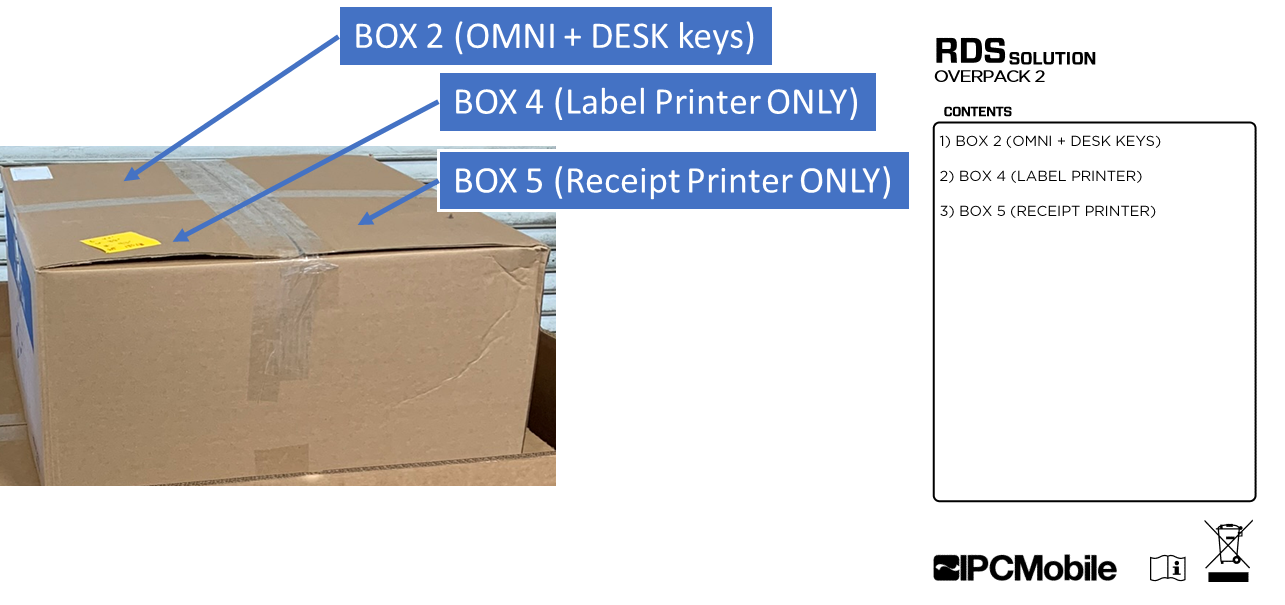
Unboxing OVERPACK 2
- Remove contents from packaging:
Unboxing BOX 1
- Remove contents from packaging:
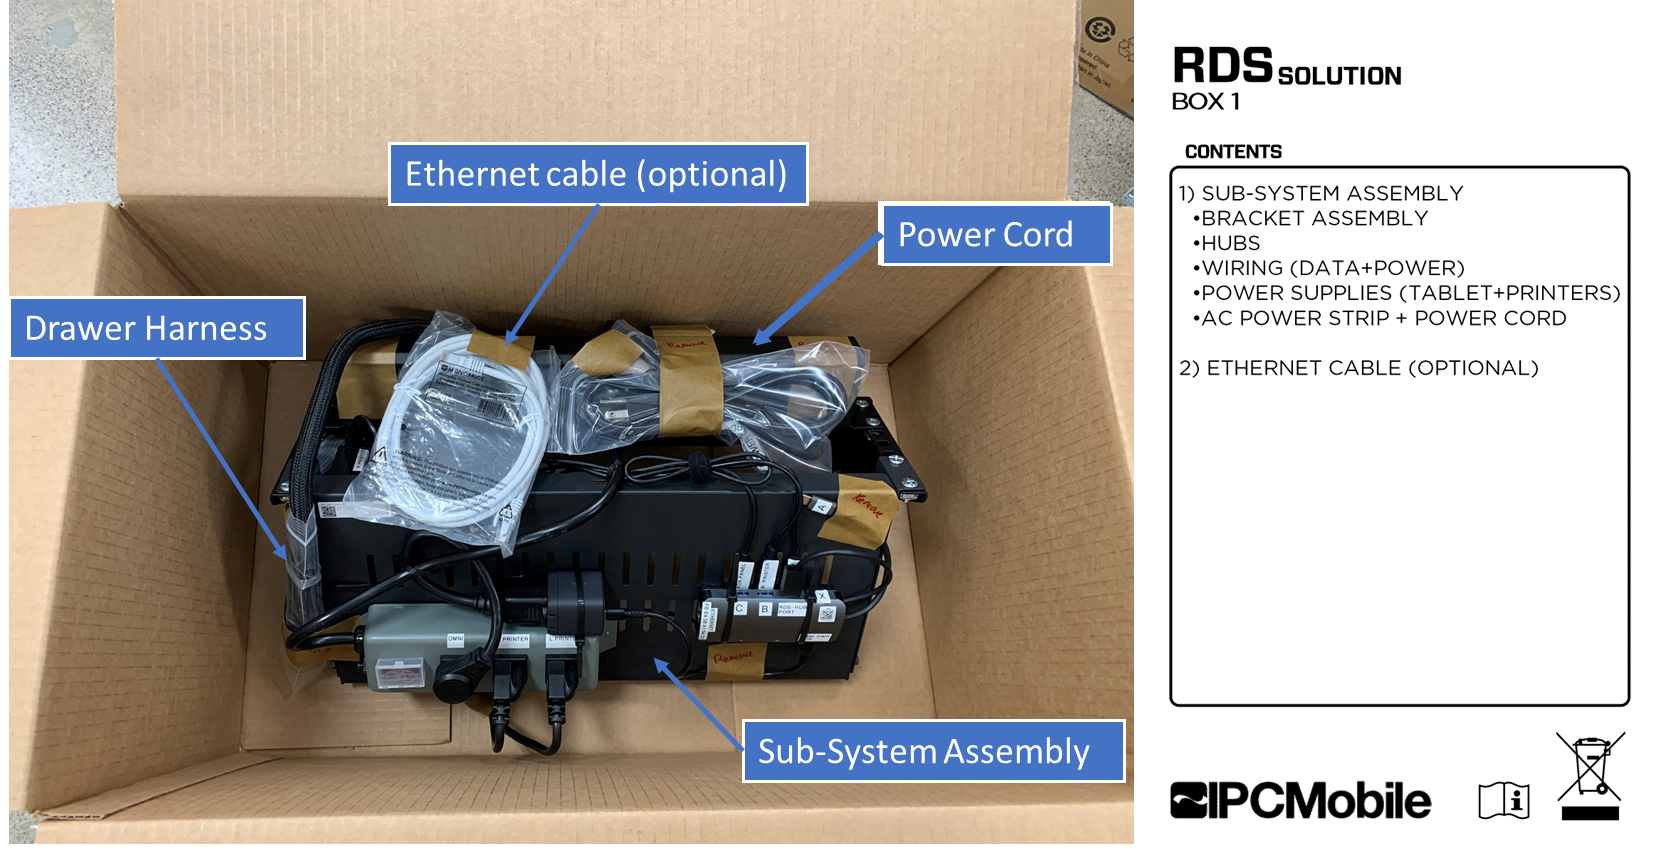
Note Take care to remove all temporary tape and poly bags used to secure contents during shipping --> Labeled "REMOVE"
Unboxing BOX 2
- Remove contents from packaging:

Unbox remaining items:
- Unbox contents from
BOX 3(Label Catch) SEE Unboxing OVERPACK 1 - Unbox contents from
BOX 4(Label Printer) SEE Unboxing OVERPACK 2 - Unbox contents from
BOX 5(Receipt Printer) SEE Unboxing OVERPACK 2
Installation 🔧
Installation
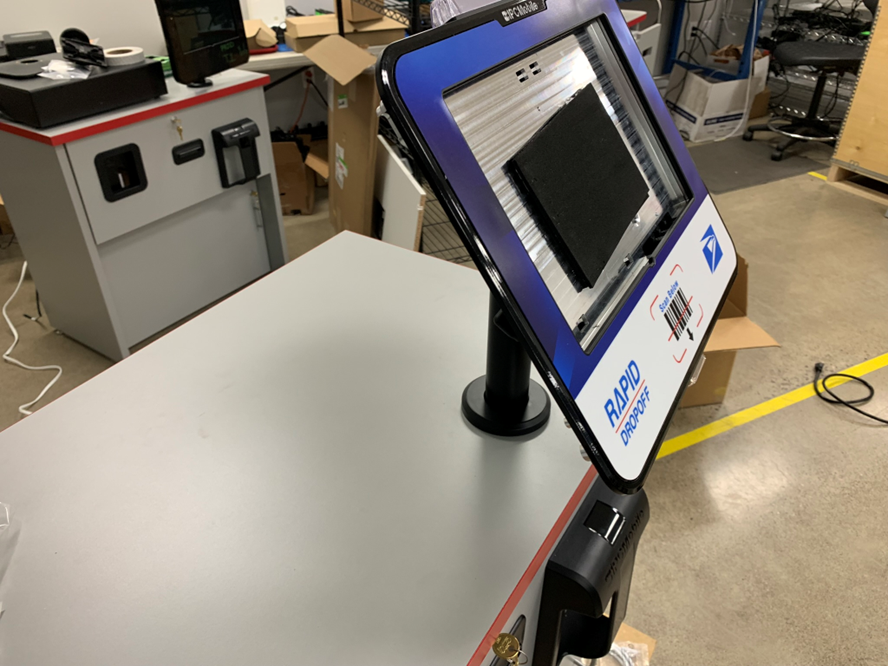
Step 1. Install Omni + Pole Mount Assembly onto Desk
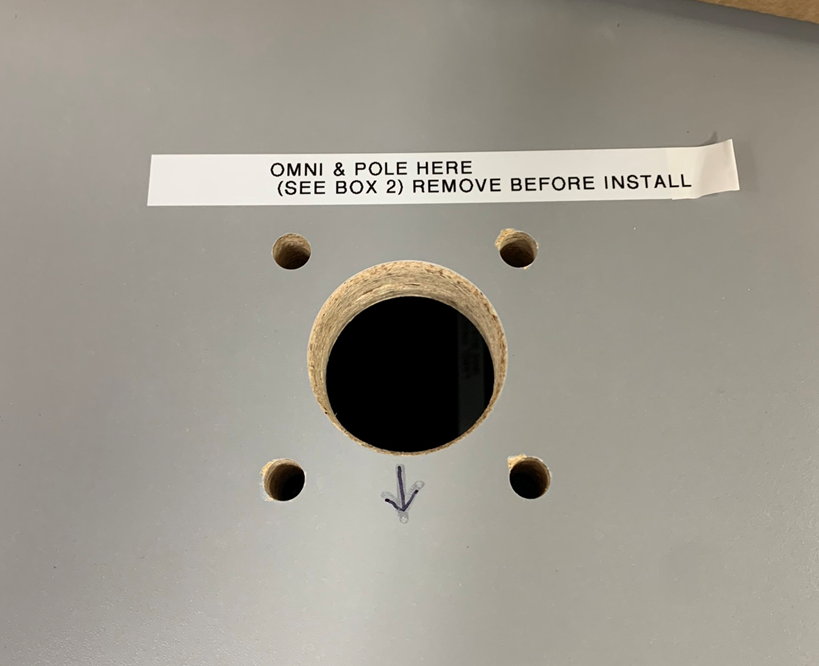
- Note install location for
OMNI + POLE. Remove temporary label.
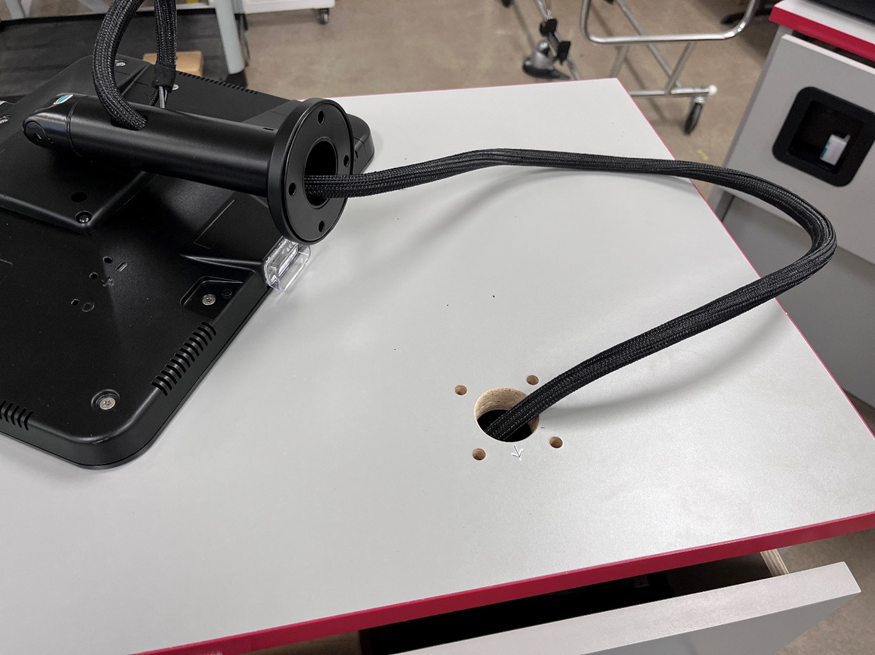
- Route
OMNIcable harness thru the large hole in theRDS DESKcountertop.
- Align the arrows on the
RDS DESKcountertop and the arrow under the Pole bolt cover, facing the same direction, and place theOMNI + POLEover the four (4) holes in theRDS DESKcountertop.
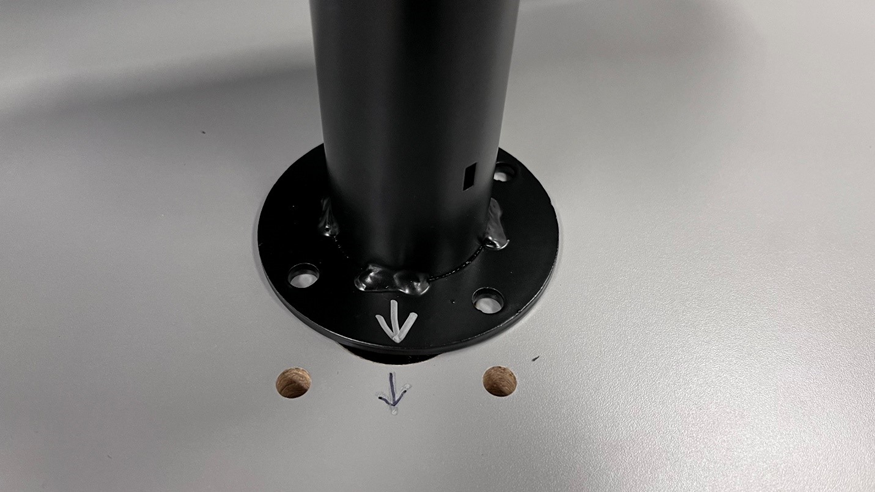
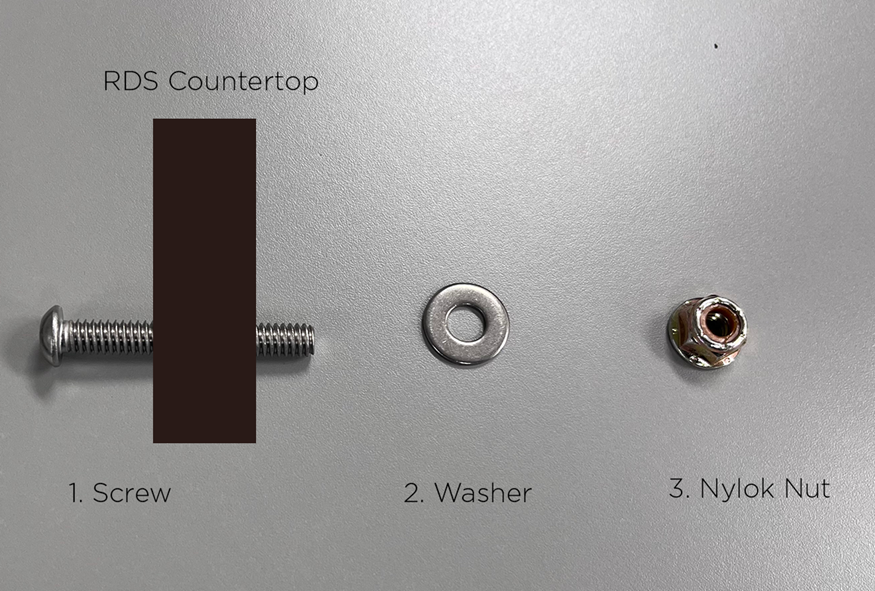
- Place a screw thru the
POLEandRDS DESKCountertop as shown. The nut and washer will be installed on the underside. Loosely tighten bolt assembly using a 5/32” allen key (supplied) and 7/16” wrench.
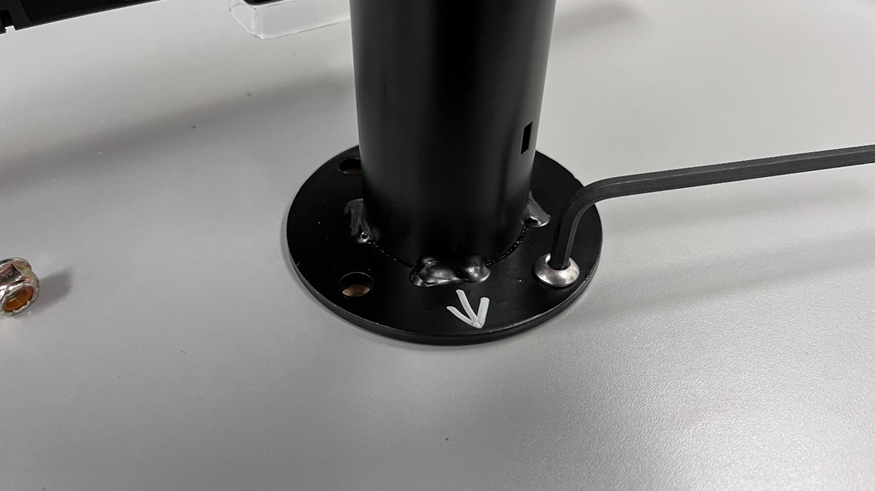
- Repeat Step 4 for the remaining screws.
- Ensure that the
OMNIis facing rearward at full rotation in either/both directions by rotating until the Omni stops. - Once all screws and nuts/washers are installed, tighten all four (4) bolts to secure
OMNI + POLEmount toRDS DESKcountertop.
Step 2. Install Sub-System + Bracket Assembly onto Desk
- Open lower
Service Door.
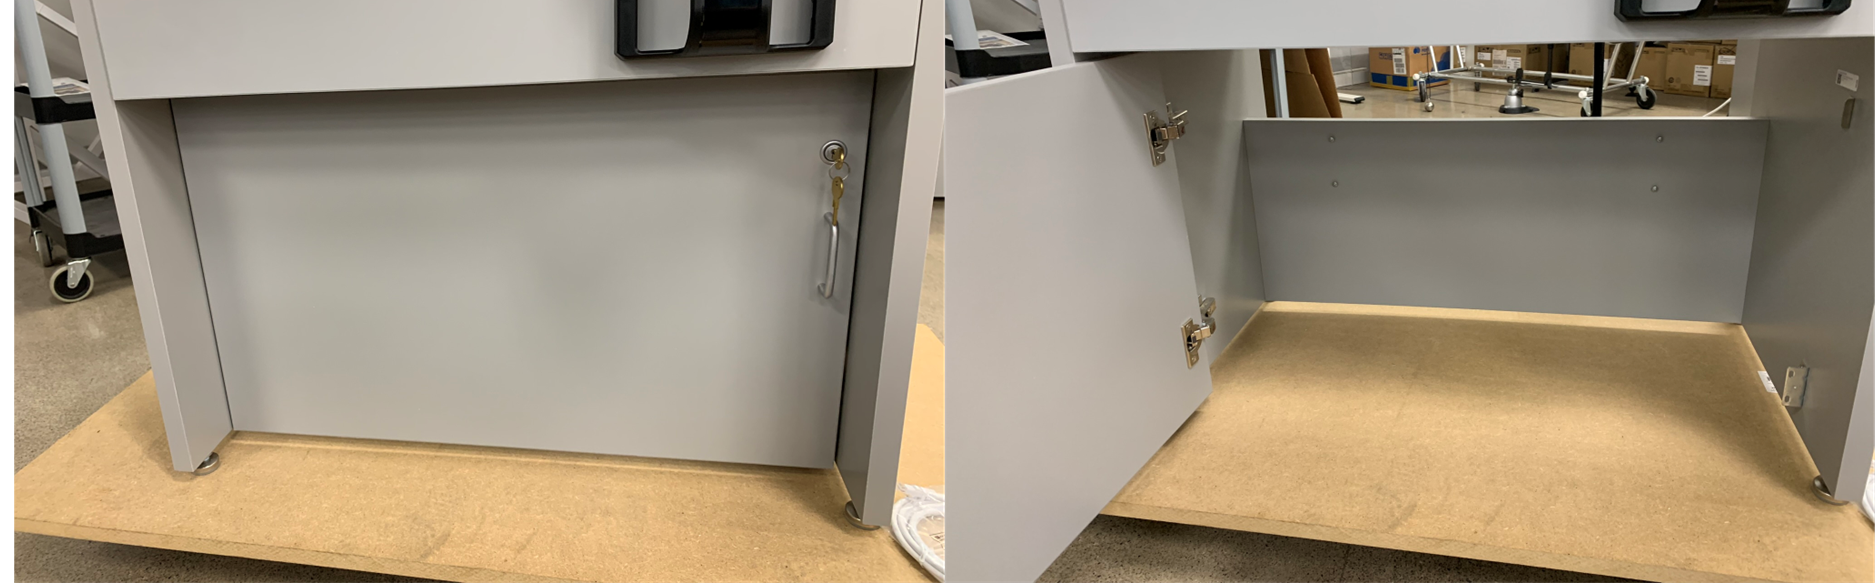
- Note install location for
SUB-SYSTEM + BRACKET.
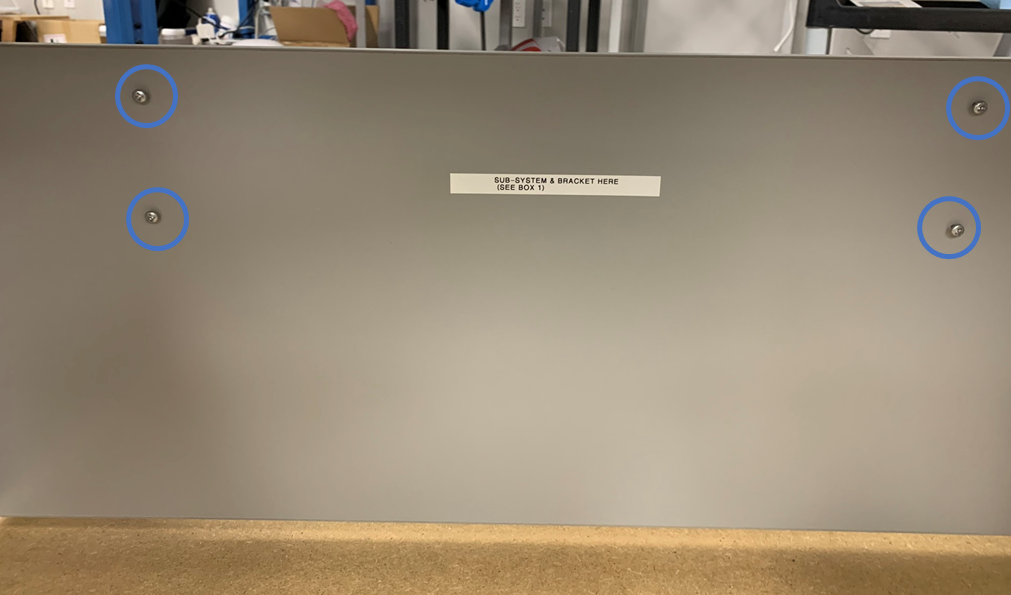
- Place
SUB-SYSTEM + BRACKETonto the 4 pre-installed screws.
- Tighten the 4 screws to secure
SUB-SYSTEM + BRACKETtoRDS DESK.
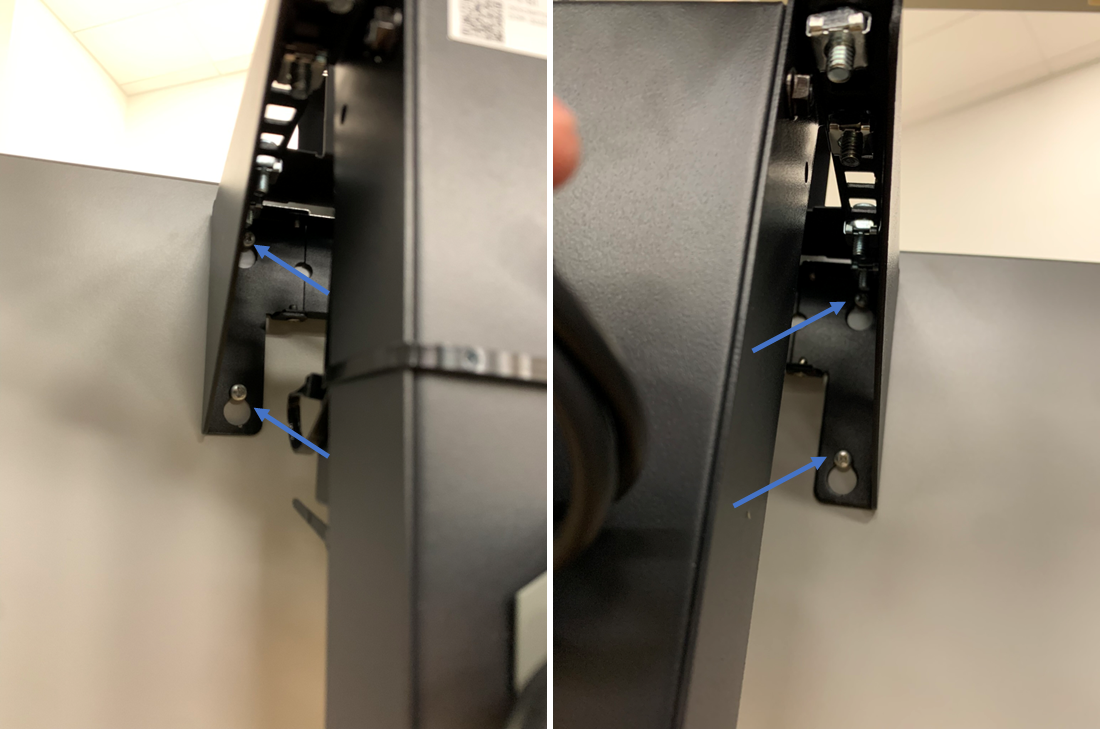
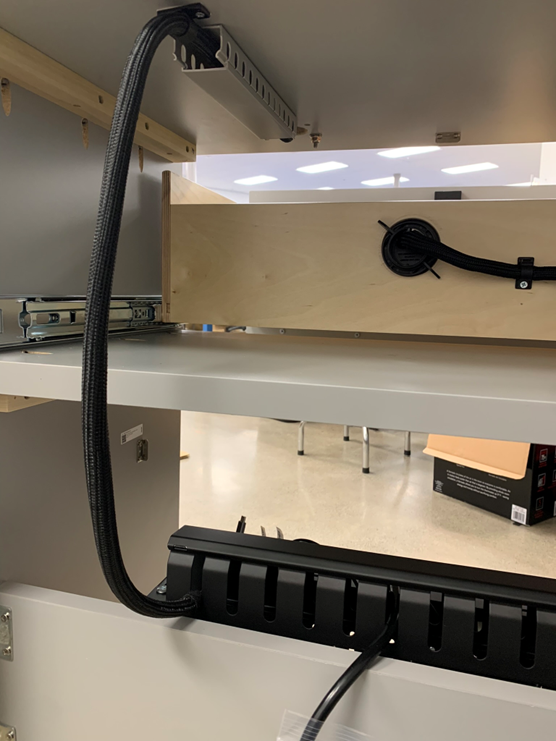
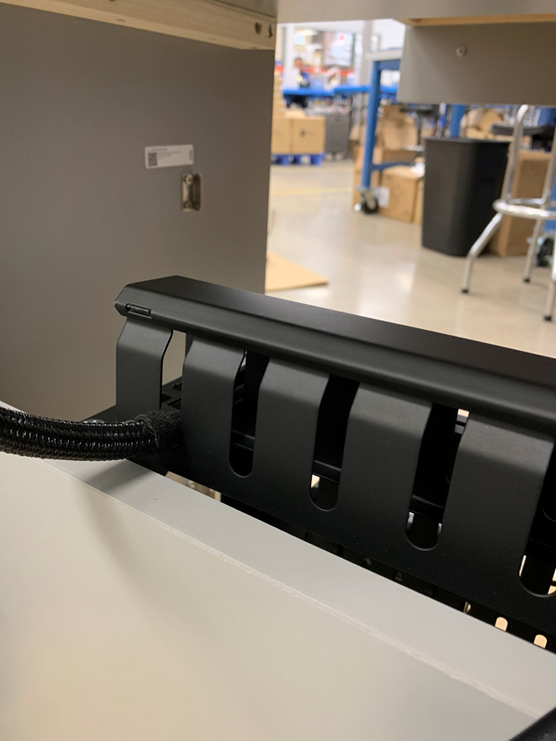
Step 3. Route Omni Harness
- Extend
Drawerfully open to gain access to underside of Desk countertop.
- From the back side, remove cable duct
capand routeOMNI Harnessaccordingly.
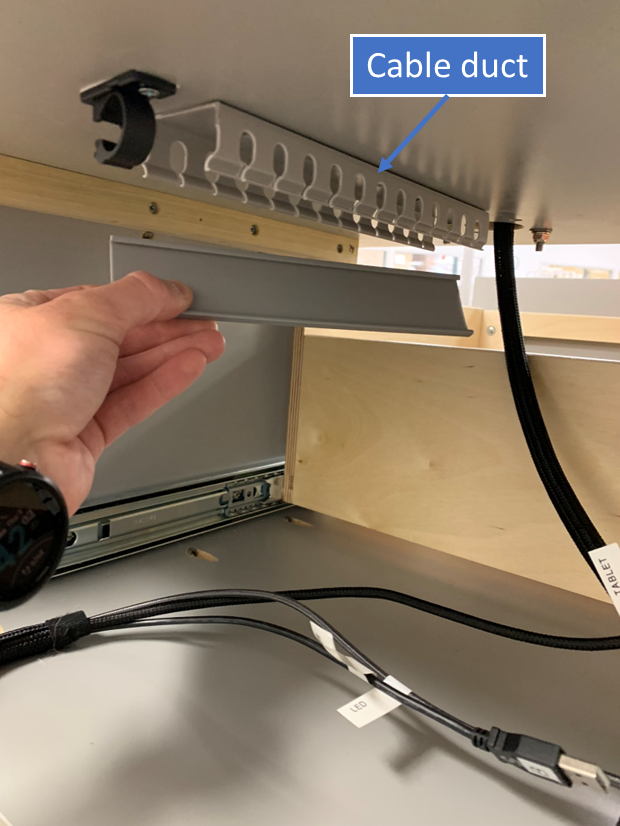
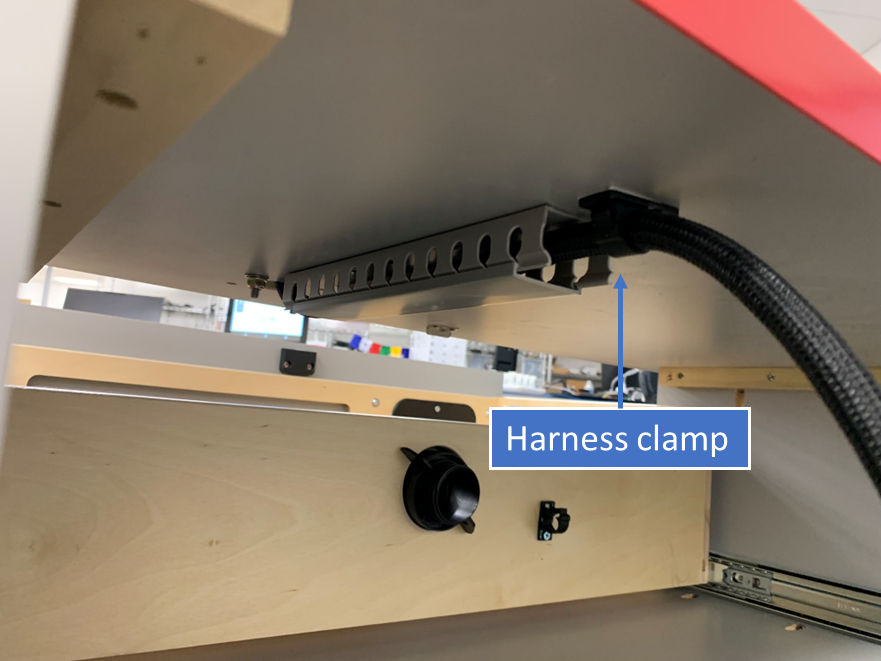
- Reinstall cable duct
capand secureOMNI Harnessby latching theharness clamp.
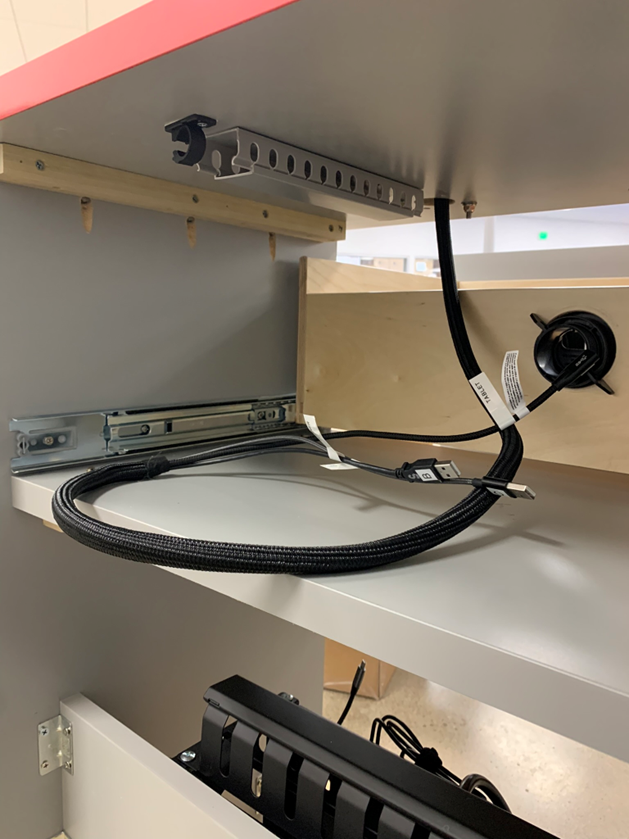
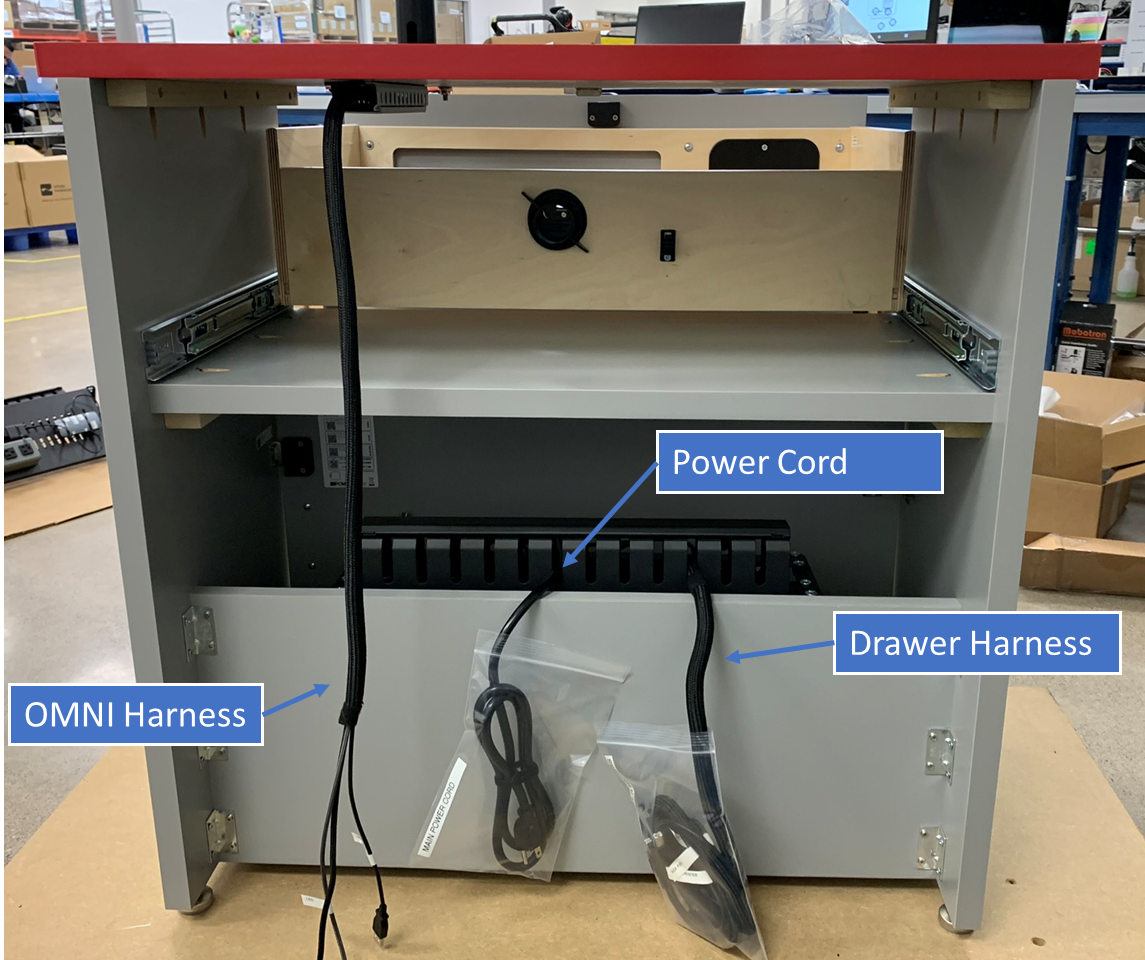
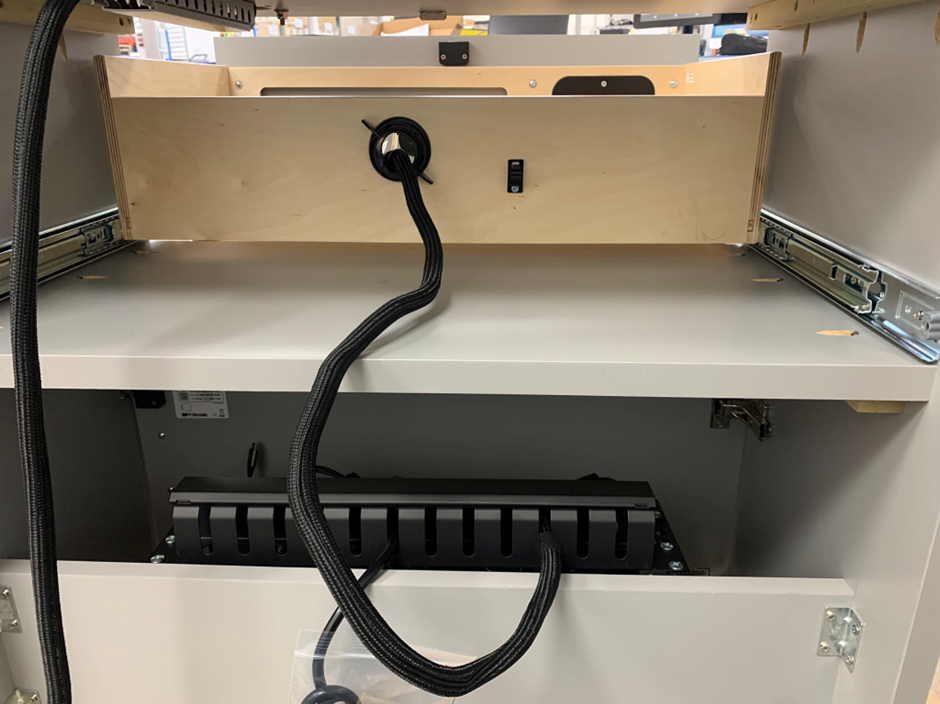
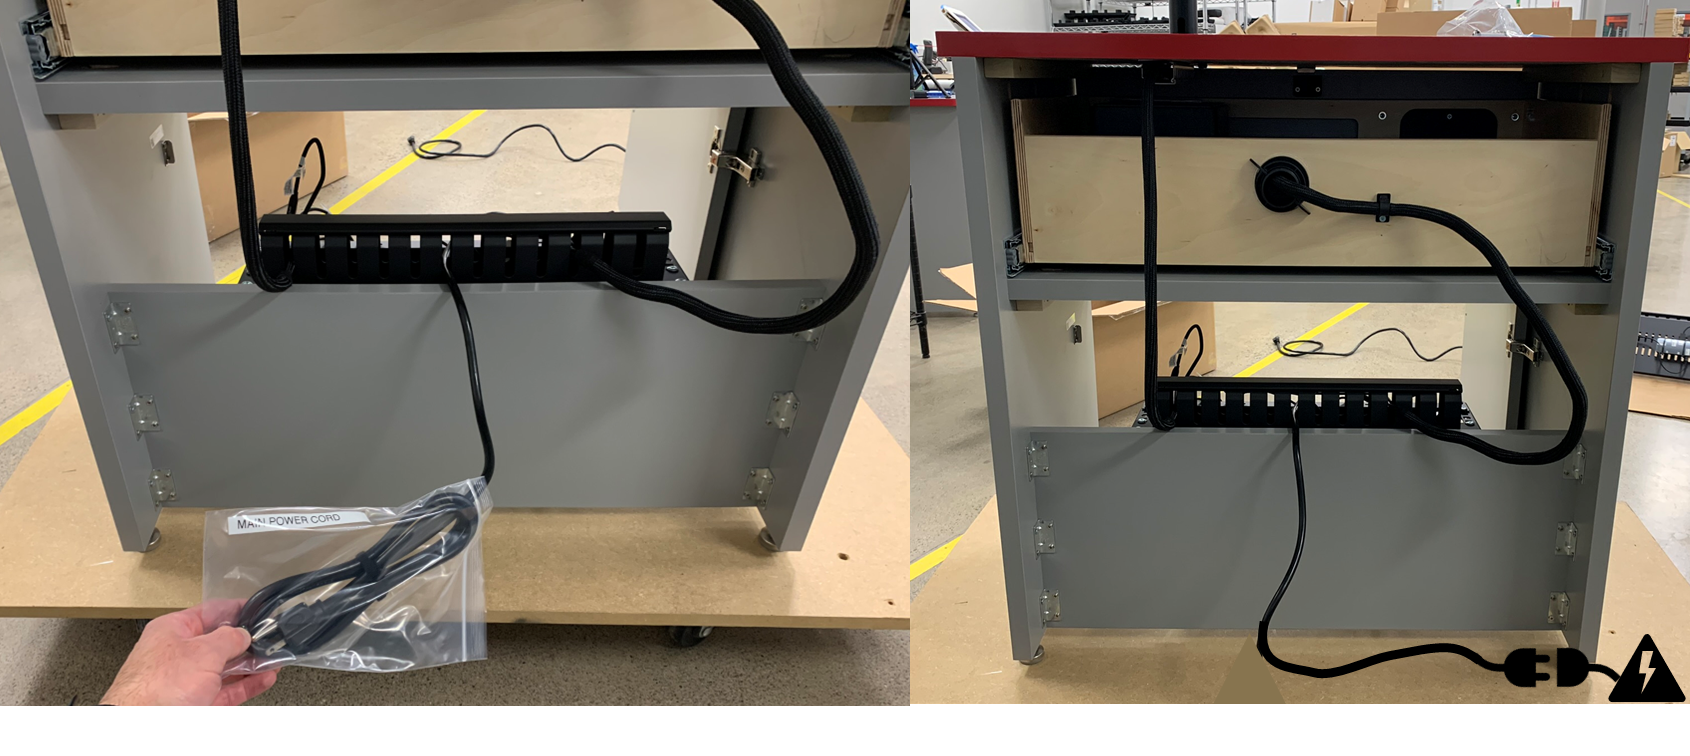
Note At this stage, the three cable harnesses (
OMNI Harness,Drawer Harness, andPower Cord) should be staged as shown:
Step 4. Route Drawer Harness.
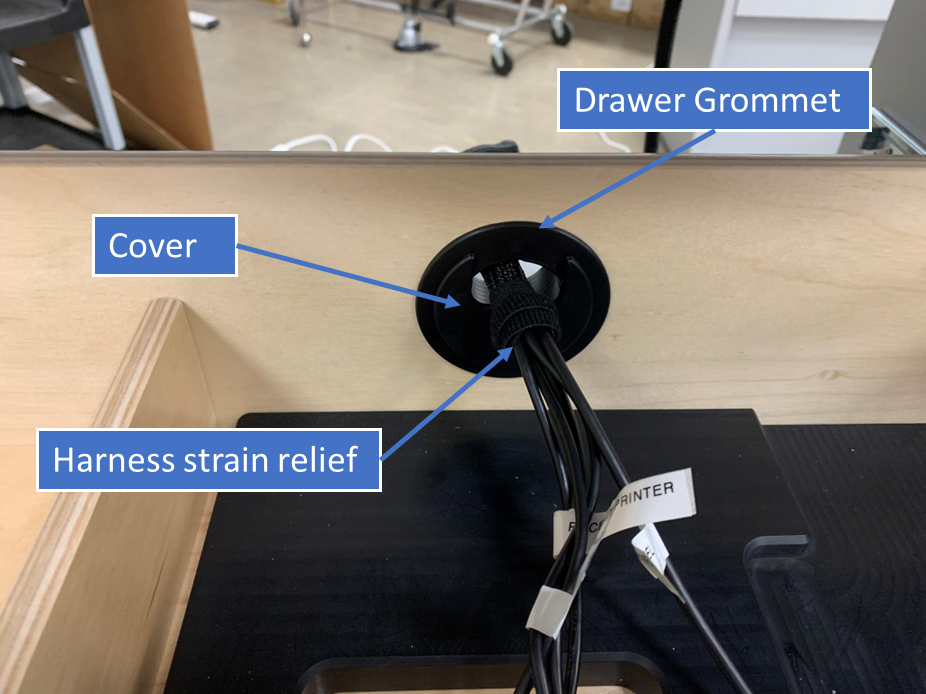
- Remove the
coverof theDrawer Grommetfrom withinDrawerof the Desk.
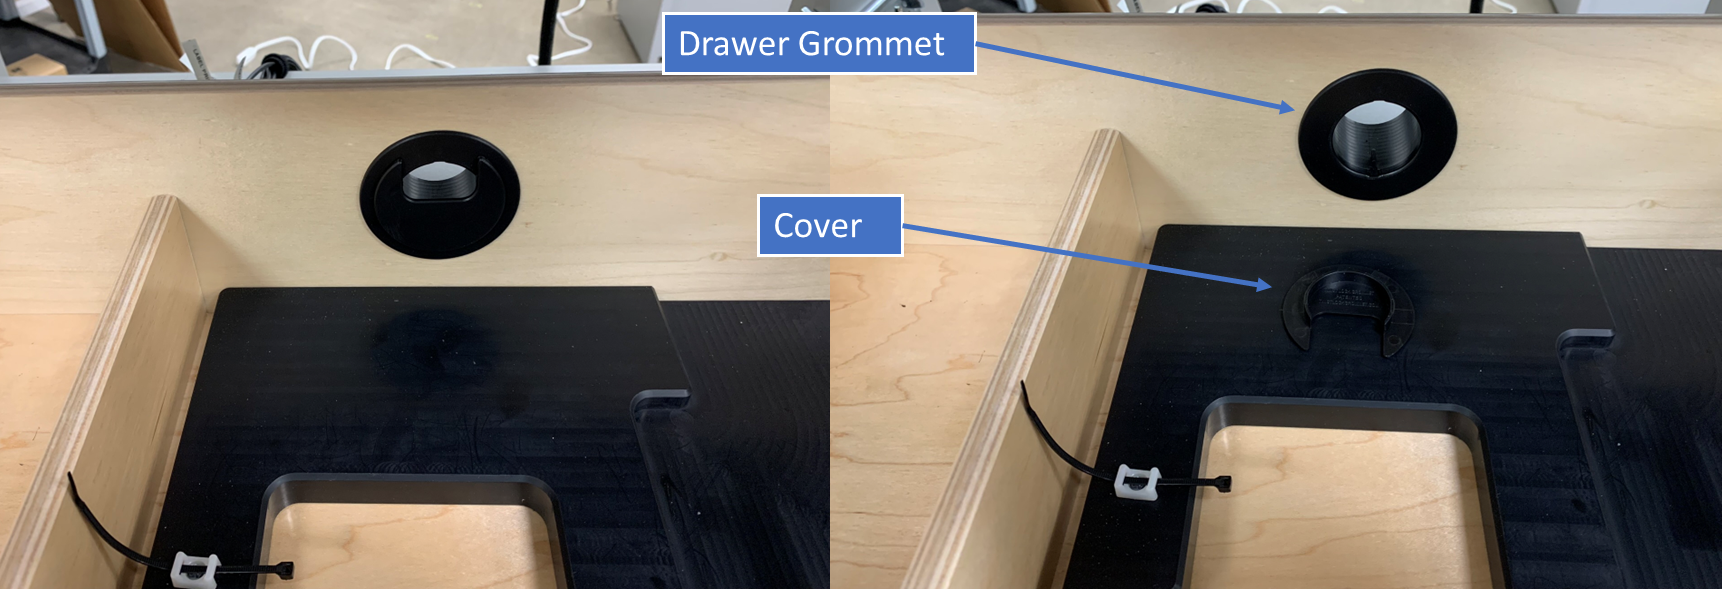
- From the backside of the Desk route
Drawer Harnessthrough theDrawer Grommet.
- Secure the
Drawer Harnessby reinstalling thecoverof theDrawer Grommet. Take care to ensure the harness strain-relief (pre-installed) is located inside the drawer area and resting against the the Grommetcoveras this will set the appropriate slack in the harness.
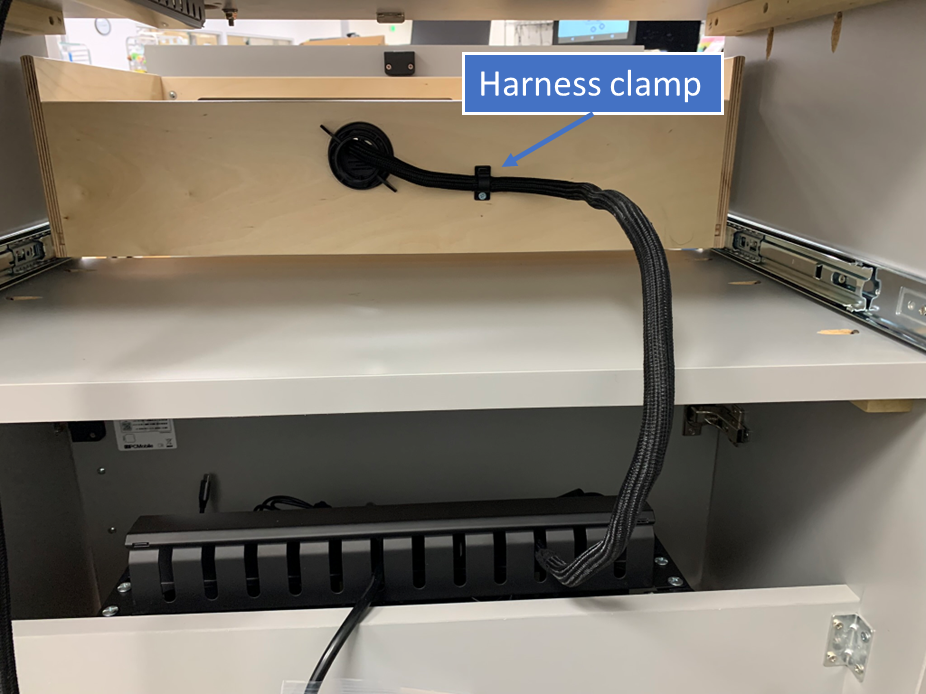
- Latch the
harness clampto lock in theDrawer Harness.
Warning Test to make sure there
Drawer Harnesshas adequate slack and does not kink or bind by opening and closingDrawerfully.
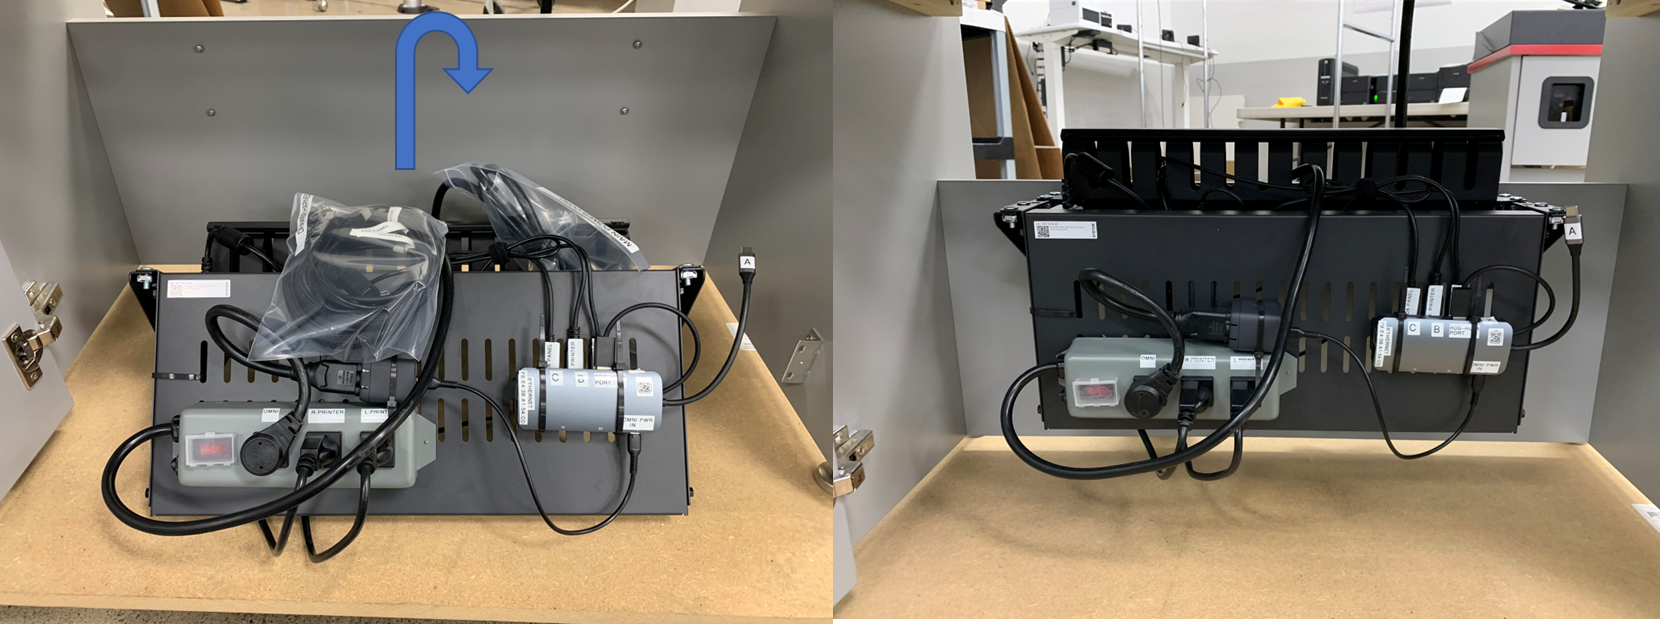
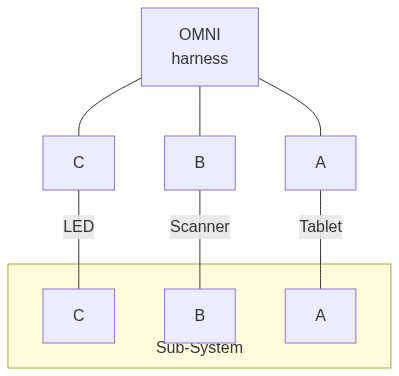
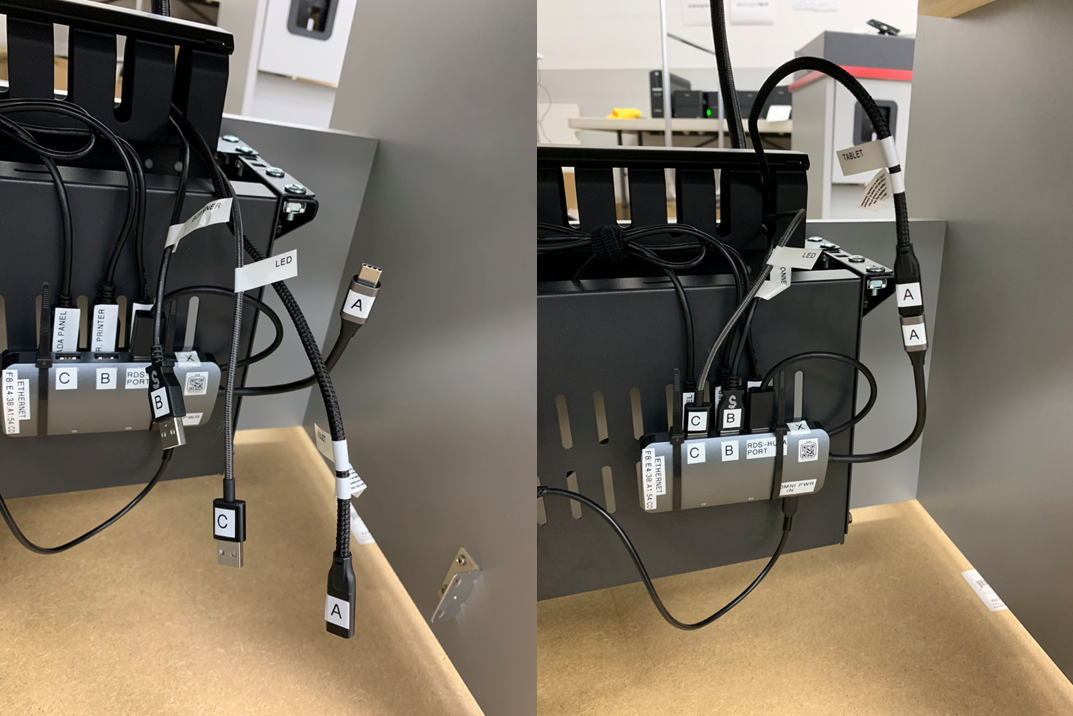
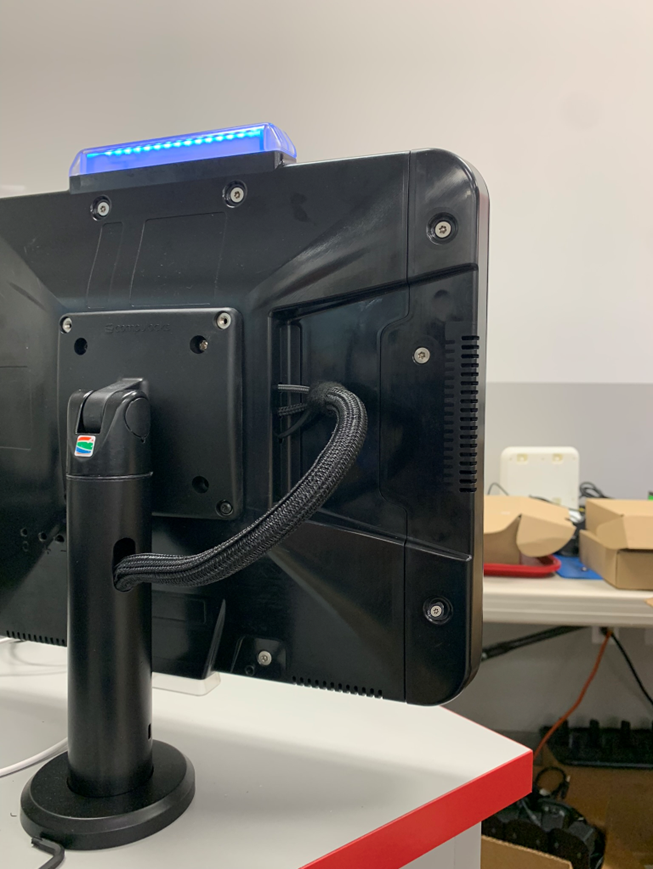
Step 5. Connect OMNI Harness to Sub-System
- Remove
coverof finger duct bracket.
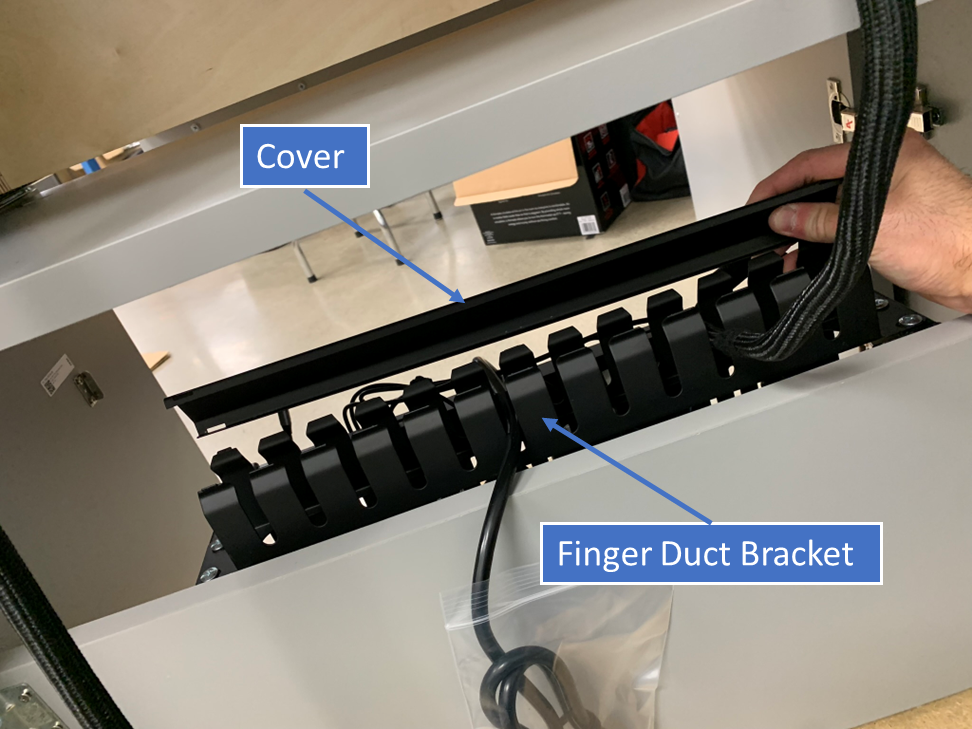
- Route
OMNI harnessas shown in designated slot.
- Reinstall finger duct
coverto secure end of harness.
- From inside the service comparment, connect the
OMNI Harnessto theSub-Systemby plugging in the appropriate connections.
Step 6. Install Label Catch
- Note install location for
Label Catchon outside face of theDrawer. Remove temporary label.
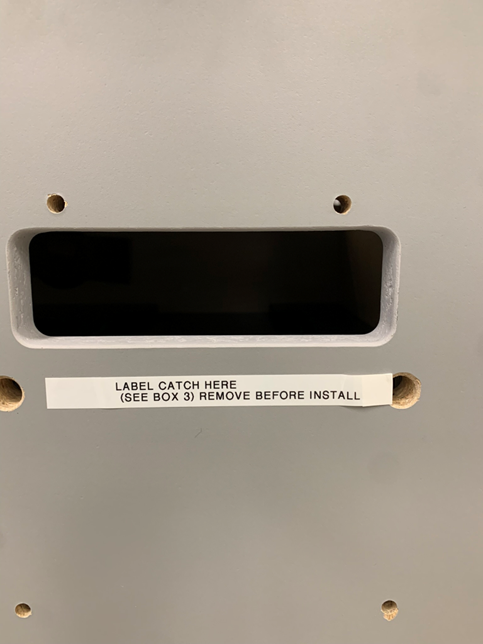
- Using supplied hardware, install
Label Catch.
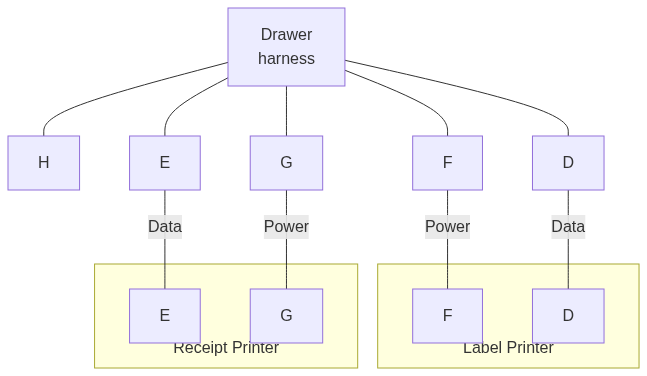
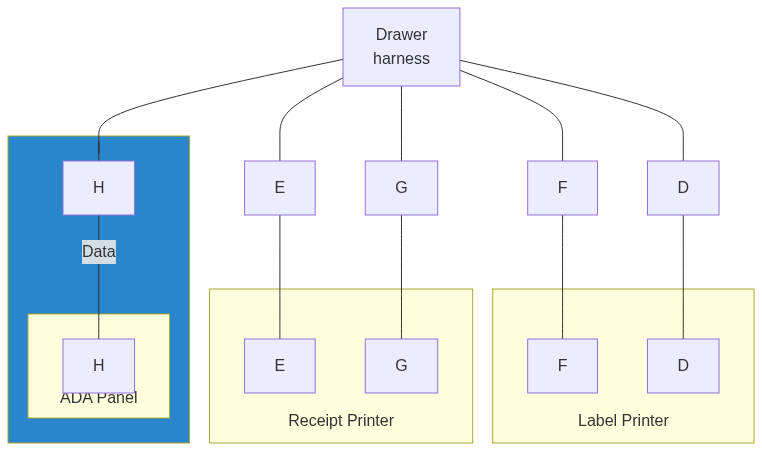
Step 7. Install Printers
- Note install location for
Label PrinterandReceipt PrinterinsideDrawerarea and labeled connections.

- Set
Printersinto approximate locations face down in order to access rear connections.
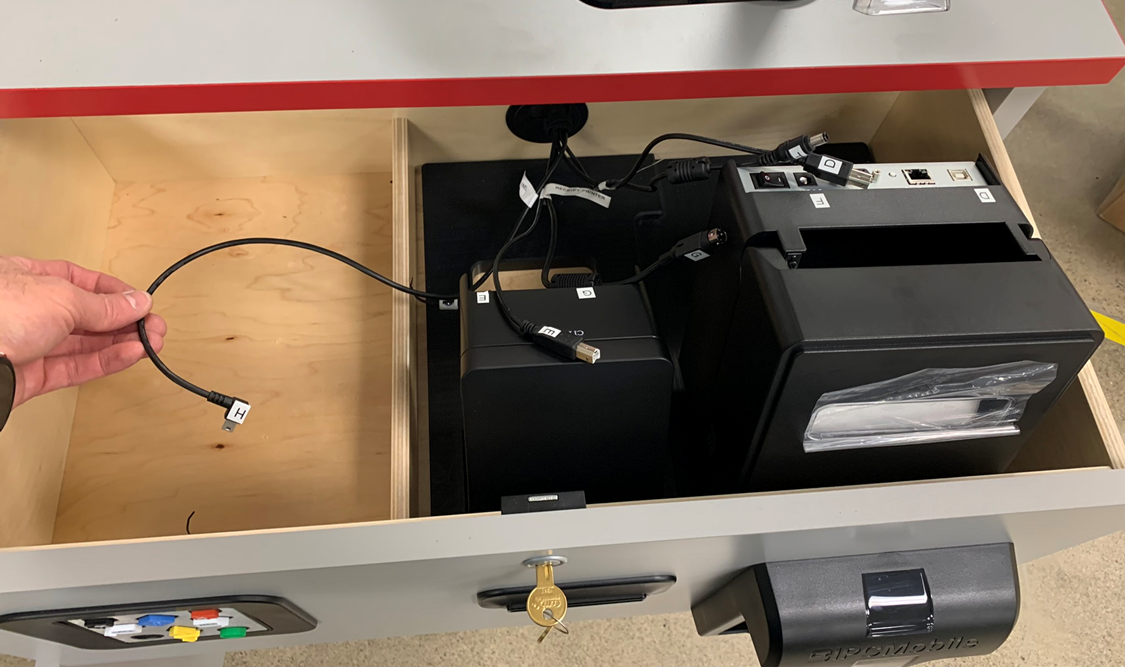
- Connect Power and Data connection for
Label PrinterandReceipt Printeras labeled.
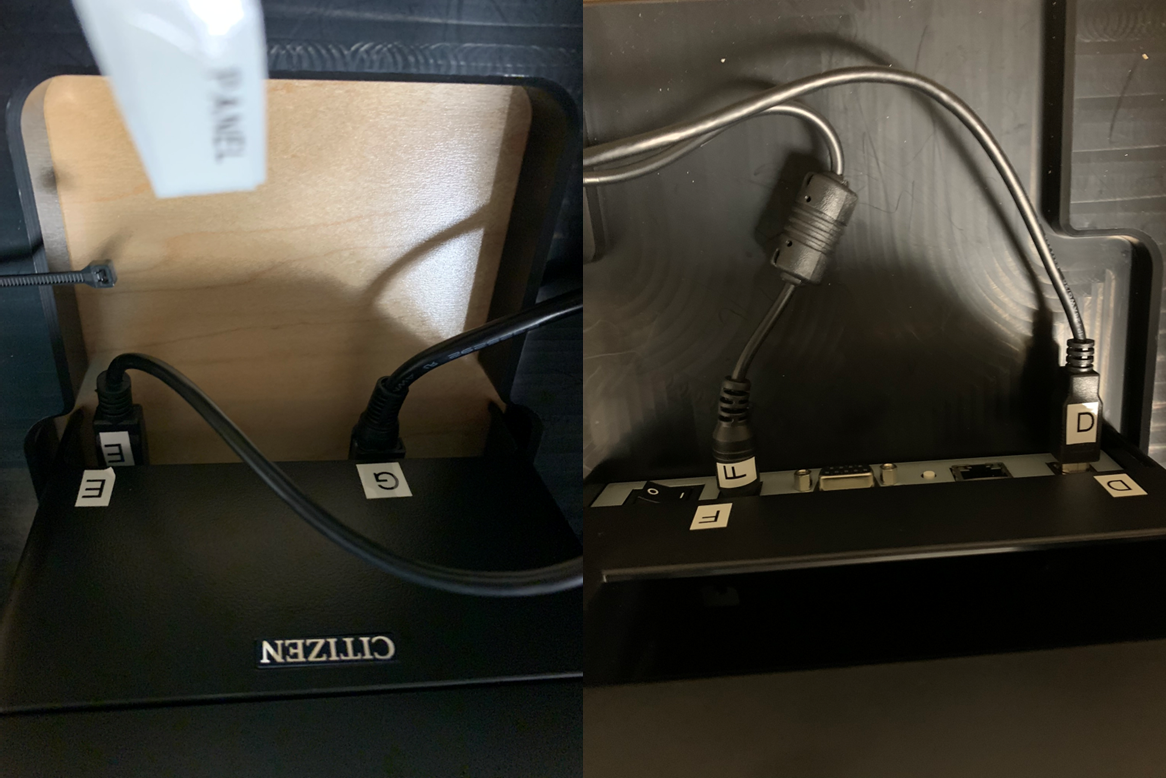
- Re-orientate
Printersinto final installation position by "dropping" them into appropriate pockets inside theDrawer.

Warning Take care to ensure that
Printersare seated flat against the base of theDrawerfor proper function.
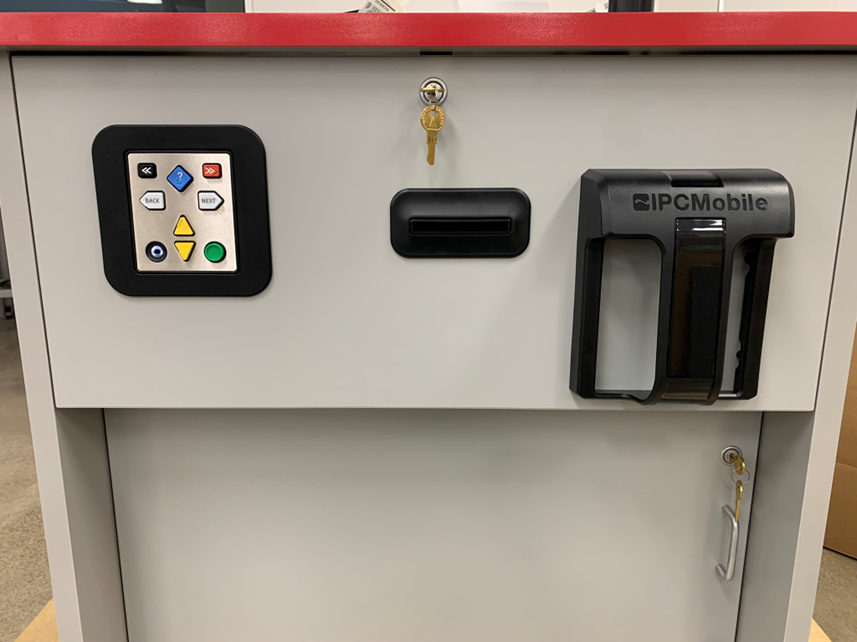
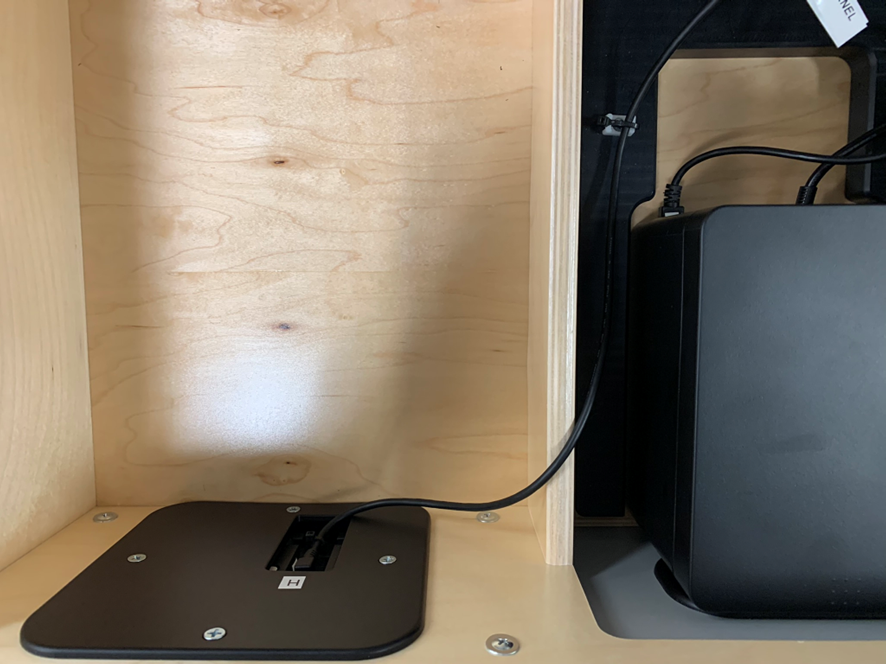
Step 8. Connect ADA Panel
- Note that
ADA panelis preinstalled intoDrawerface and the data connection port is located inside and marked.
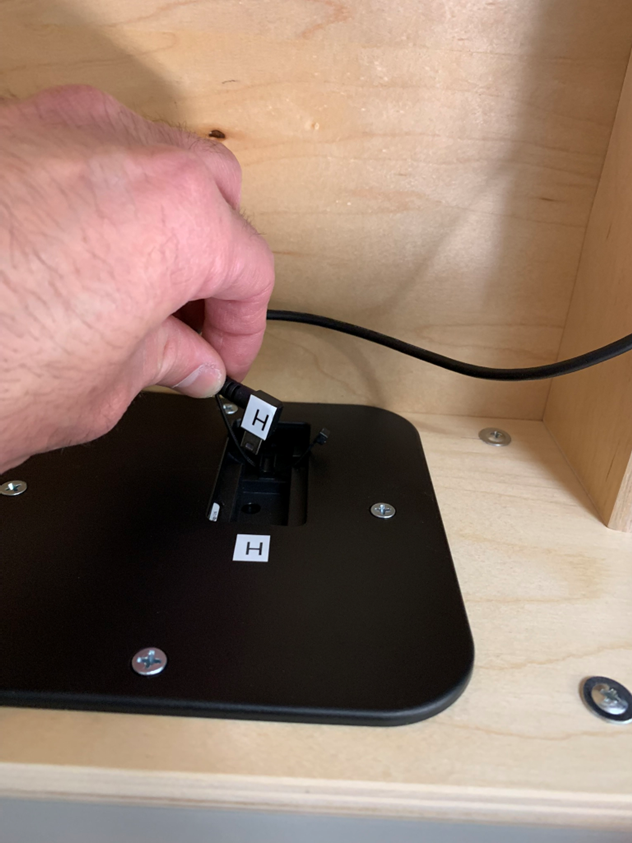
- Route appropriate data cable as shown and connect to
ADA panel.

- Tighten zipties (pre-installed) to secure cable.
Step 9. Connect System to Power
- Connect
Power Cordto AC power.
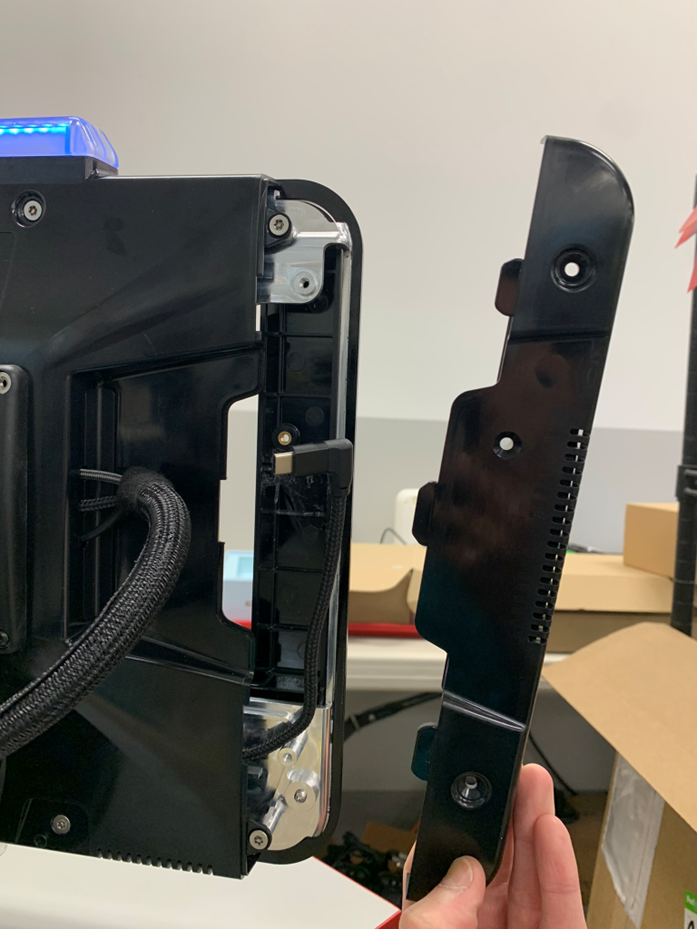
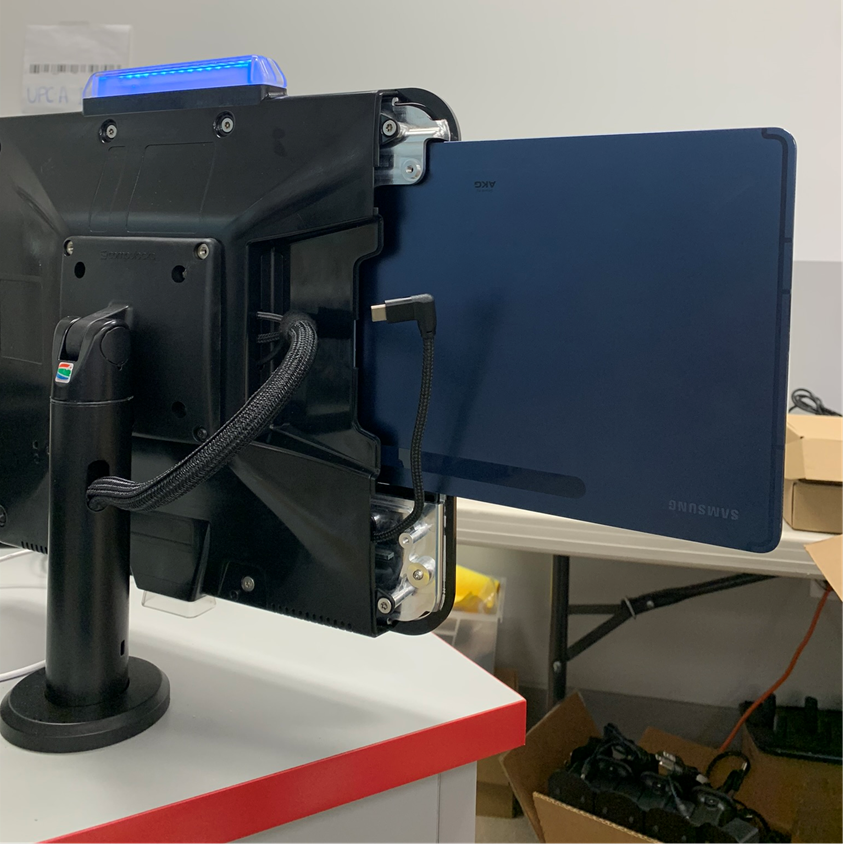
Step 10. Install Tablet into OMNI
- Using supplied T20 allen key, remove 3
security screwsfrom OMNIside cover.
Note
Take note of screw lengths and their proper location. The middle screw is the longest.

-
Remove
side cover.
-
Slide in
Tablet, taking care to insert with the USB-C end last.
-
Seat
Tabletfully and connect USB-C cable toTablet.
-
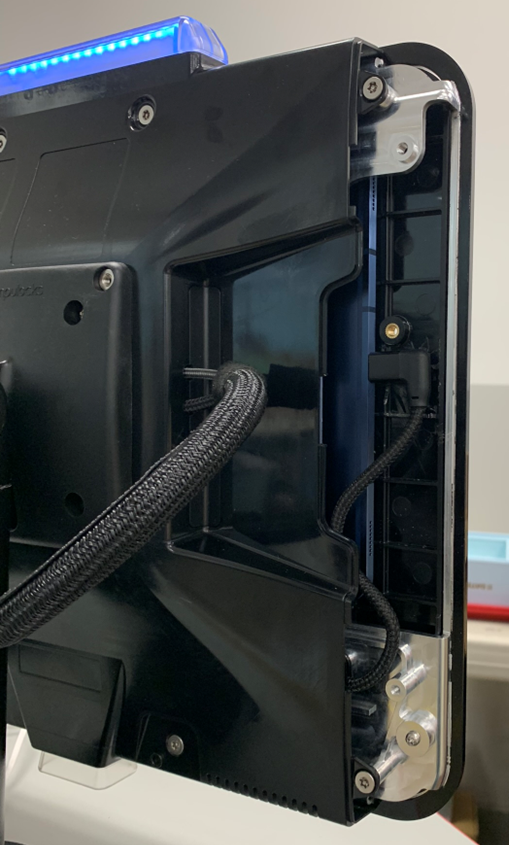
Reinstall
side coverandsecurity screwsto secureTablet.
Optional Step. Install Ethernet Cable (if NOT using WiFi)
-
Using supplied
Ethernet cable, connect one end to appropriate connection onSub-Systemlocated in service compartment ofRDS Desk.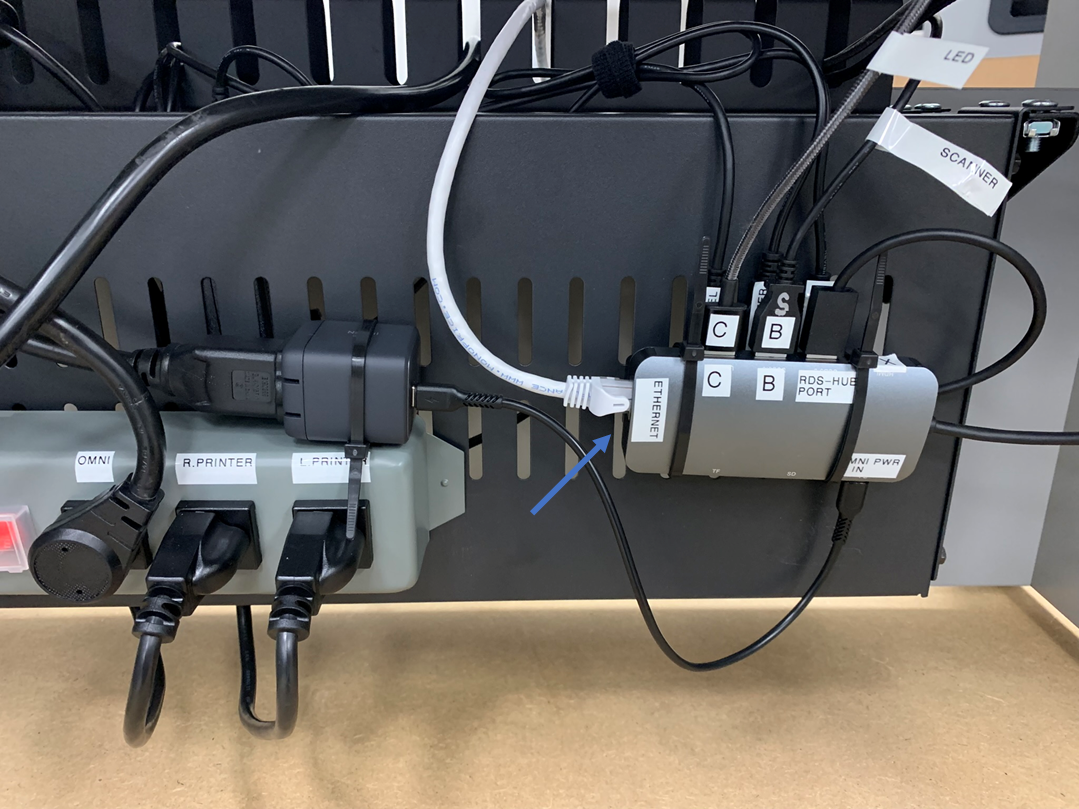
-
Connect other end to LAN network jack.
-
Network connectivity and proper connection can be confirmed on
Tabletscreen by Ethernet icon visible in upper right taskbar.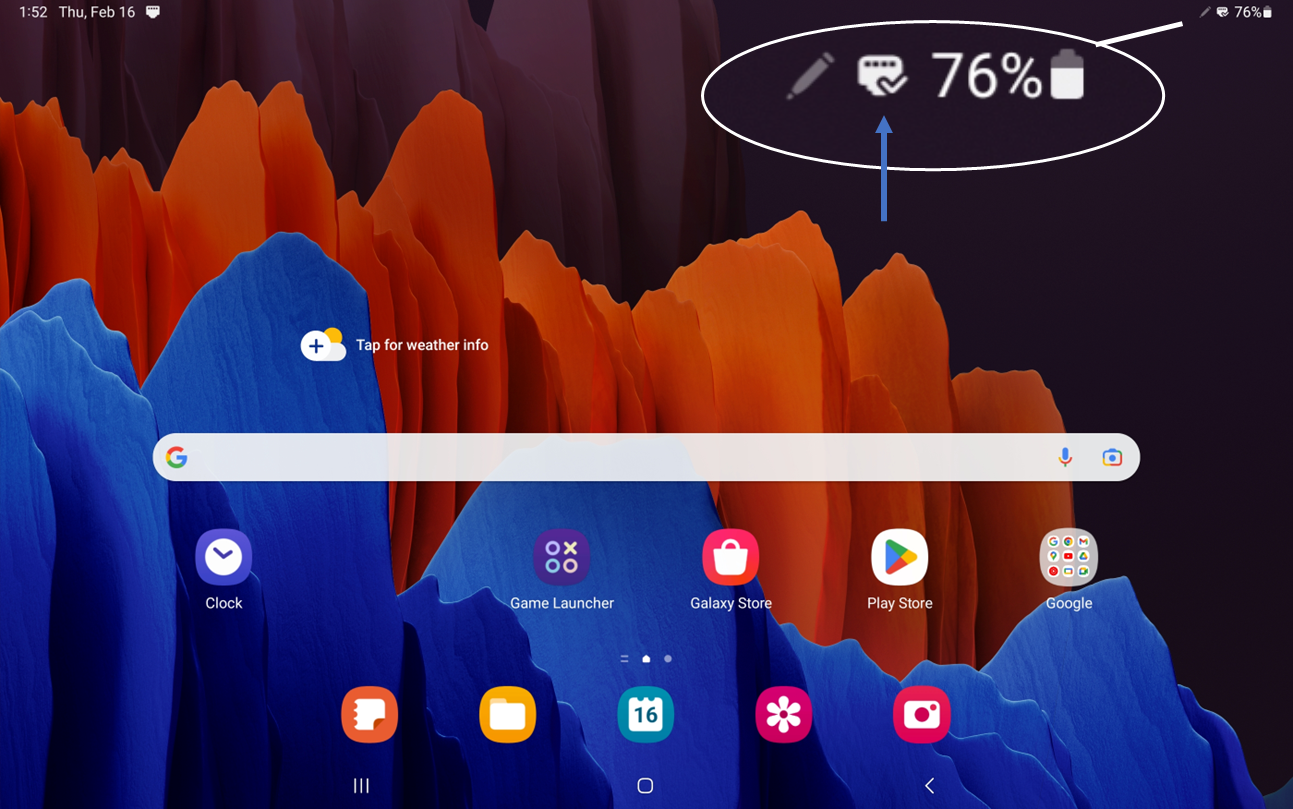
System is now READY for provisioning and testing.
[^1]: Service Door and Drawer should be unlocked. If for some reason this isn't the case, the Keys are packaged in BOX 2 with the OMNI device. SEE Unboxing BOX 2 for reference.